Saturday 19 April 2014

71 - How will you view the dependancies of an object?

Why -- Let's assume that because of some business requirement change, one of the column of your source definition is no longer exists or deleted from database. It's an obvious impact to your workflows; wherever that particular source is getting used. If you run the workflow, it would fail as the particular column doesn't exists.

How -- Then the next questions comes is, how can we find all Workflows / Mappings etc objects which are dependent on particular source? Informatica by itself, provide you the facility to find out the dependencies.


As shown in a diagram, if we right click on particular source / target or any infra object a popup will appear which will have "Dependencies.." option.


Once you click on "Dependencies" option, another window will appear. There you can choose options of Object Type which you need to search for respective object "Dependencies".

In this case, I want to find out, my source "Countries" table is getting use at what all Mappings and Workflows.. So I will uncheck rest all object types except mapping and workflows.


Once you click on Ok, your search results will appear on separate window as below


61 - Explain any scenario of XML Parser

Why -- In earlier post we saw how can we use XML Source in a mapping, when the input file is a XML format. However, that is not always a case. Most of the times, instead of physical file, designer store the xml file text into database column. In such cases, we can not have XML as a Source, but it has to be a relational source.

If that's the case, then how can you read / parse the xml text? Informatica has provided XML Parser for it, it works same as your XML Source, however the difference between these 2 is, for XML Source we give file path as an input and for later one text port is an input

How -- How is works? its simple... please have a look at below mapping --

As stated earlier, our source is Oracle and XML Value will come as an Text, which we will give as an input to XML Parser.
XML Parser will do the same work as XML Source which we had seen in earlier post. You can refer below link to learn more about relationships between XML Entities.
http://gyaankatta.blogspot.in/2014/04/59-explain-any-scenario-of-xml-as-source.html

As shown in above image, XMLText column from source will act as an input to XML Parser's DataInput port. and remaining part will be same as earlier post which we have seen.

XML Source File

<?xml version="1.0"?>
<myComp>
 <odc id="cisco">
  <employee id="mgogate1">
   <FirstName>Mandar</FirstName>
   <LastName>Gogate</LastName>
   <Address>
    <Area>Girgaon</Area>
    <City>Mumbai</City>
   </Address>
  </employee>
  <employee id="staksale">
   <FirstName>Sudhir</FirstName>
   <LastName>Taksale</LastName>
   <Address>
    <Area>Kothrud</Area>
    <City>Pune</City>
   </Address>
  </employee>
 </odc>
 <odc id="CreditSuisse">
  <employee id="asjaiswa">
   <FirstName>Ashish</FirstName>
   <LastName>Jaiswal</LastName>
   <Address>
    <Area>Bhopal</Area>
    <City>Madhya Pradesh</City>
   </Address>
  </employee>
  <employee id="sgakhar">
   <FirstName>Sakshi</FirstName>
   <LastName>Gakhar</LastName>
   <Address>
    <Area>Kurukshetra</Area>
    <City>Hariyana</City>
   </Address>
  </employee>
 </odc>
</myComp>

59 - Explain any scenario of XML as a Source

We will take a simple example of XML file which is as below. We will import this xml file as a XML Source and load the data from it to a relational target.
http://gyaankatta.blogspot.in/2014/04/xml-source-file.html

Import XML as a Source --

You can import the XML file by navigating menu "Source" --> "Import XML Definition".


Informatica will prompt you number of option at the time of importing xml as shown.

In this case, we will go with the default option "Entity Relationships".

Once you click on Finish, your source xml file will get imported as an Informatica Source.


Relationships Between Entities -- As we have chosen the option of "Entity Relationships", xml file got imported with some relationships between the entities its caring.

If we observe the data of our XML file, you can find that there are 3 tags
1. <myComp> -- is a root tag, which hols all other entities inside it. So, after importing xml file, in a relationship its showing as a Root Tag, having relationship with <odc> tag
2. <odc> -- is a subsequent tag coming after <myComp>. As it holds <employee> again inside it, you can see its relationship with it.
3. <employee> -- is a leaf tag you can see in your XML Source; If we observe the relationship between <odc> and <employee> its many to many [as shown by arrow]
You can change this relationship by clicking on corresponding tag at left panel and then its corresponding properties tab below [highlighted by rectangle]

In an xml file, you can find <Address> tag residing inside <Employee> however that does not appear at above image. That's because, it does not have a many to many relationship with parent tag <employee>

If needed, you can create a new XML View in current xml definition above and make its 1 to 1 relationship with its immediate parent tag <employee>. Make sure you delete the entry of <Address> tag from Employee View.

Working with actual Mapping --
As shown above, we have 3 XML Views separately with their internal relationship inbetween. If we want to process data as a whole from all 3 views, we need to join them using Joiner Transformation. All these 3 views will be treated as separate data sets, but as the granularity of each data set is different, we can not join them without Joiner Transformation.

Also, since the source is same for both inputs of our joiner transformation, we need to select Sorted Input otherwise informatica won't allow you to do that.

As shown in image, to connect each XML View or a Data Set, we will require separate Joiner. The condition to join these data sets will be a Primary Key and Foreign Key relationship between those two created by Informatica by default.

As these keys gets generated internally by Informatica, and though we have clicked on Sorted Input, we do do not have to worry about keeping a sorter inbetween to sort it again.

Now the next task is to join the 2 Joiners which we created to join XML Views Comp -- ODC and ODC -- Employee. As the common condition between these 2 dataset is "ODC", we will use that as a join condition to join these 2 data sets. So, our mapping structure will be as below

To complete the mapping we required totally 3 joiners. Now just create a corresponding workflow and run the mapping.

Note -- if your informatica is installed on linux machine, make sure you will store the source xml file on linux machine. If you give your windows [client machine] path as a source file, your mapping will get fail giving below error
HIER_28039 Message: HIER_28039 Reading data from source file [filename.xml]


58 - How will you transfer CLOB Data to BLOB Data using informatica

Requirement -- You have a oracle source column which holds CLOB data and you have to insert same data into a target column which is of type BLOB. So, you need to convert CLOB data into BLOB via Infrmatica Mapping.

1. Lets create a source and target first;

Source Table Create Table CLOB_Source
(Idx      NUMBER(3),
Text_File      CLOB);

Target Table
Create Table BLOB_Source
(Idx      NUMBER(3),
Text_File      BLOB);


2. Insert some dummy data into newly created source

insert into Clob_Source values (1, 'This is a Clob Source Text');


3. Create a simple mapping to pass data from Source to Target

As you can see, if you simply try to connect your source qualifier port "MyText" which is automatically got converted to text datatype to target MyText which is of BLOB, informatica will not allow you and pops up an error as "Data types text and blob are incompatible"

How will you overcome this error ?
 You can change the Source Qualifier data type to Binary and then informatica will allow you to link the port, however, when you will validate the mapping, you will get the error again as mentioned in above image.

But, if you add a Java Transformation in between Source and Target, you can achieve it.

- Add (Passive / Active) Java Transformation, and add extra out port BLOB_MyText into it along with source ports id and MyText.
- Write a simple java code which will actually convert your Clob to Blob as below
         Blob_MYTEXT = MYTEXT.getBytes();
- Connect the ports and validate the mapping


As you can see, I have created passing Java Transformation, and added corresponding code at "On Input Row" table, which will actually convert CLOB data into BLOB.

Note -- If you are doing Bulk Load, your mapping gets fail giving below error.

Database errors occurred:
ORA-39778: the parallel load option is not allowed when loading lob columns


However, I have observed that its specific to your oracle version.


57 How do I restore the previous version of a particular mapping/session/workflow?

Why -- Well, number of times you need to find out that a particular code got deployed in which release. Moreover, most of the time in development you need to bring back your earlier committed code. Thanks to informatica to give the usability to do so.

How -- Now how would you bring back / restore the earlier version of your committed code? Now be it a any informatica object, like Source, Target, Mapping, Workflow, Session, etc. you can restore or see the earlier code / history of it.
In this case we will take an example to restore the earlier mapping of informatica.

1. As you can see in an image, if you right click on your mapping name, and go to versioning option it, you will have option to view history.

2. You can also view History by click on Versioning Menu of a mapping designer.


 Once you click on "View History" option, another window gets open, which will show you the entire history of your committed objects such as source, target, mapping, workflow, etc.


Now to see the actual code of your history object, in this case the mapping code of version - 1, just right click on respective version and click on "Open In Workspace" option.

Once you do that, respective code you can see.

You can export particular object, in this case its a mapping and re-import it as a new revision.

However, I have seen limitation in doing so if you do any changes at Target.

56 - How to re-point a session task to a different mapping

Why -- Though it's not an interview question, but at the time of development you will some time you will feel the need to do so. 

Lets assume you have a mapping say Map1 and its respective session / task as Session1. Now I have to do some logic change in my Map1, so before doing that I created a backup of it "Map2" and done the changes in my original Map1.

So my current Mapping and Session relation is as below


We have our original Map1 connected to Session1 and a backup Map2 which is not attached with any task currently.

After modifying Map1, business team ask to revert back the changes and now you want Session to point to Map2 [backup mapping] instead of Map1.


How -- How will you point your session to map2? there are 2 ways as below

1. Rename the mapping name -- You export your Map2 and edit that into editor to replace Map2 to Map1. By simply changing the export file name from Map2 to Map1 won't help, but you need to replace actual content [ mapping name tag value] inside the file.
Once you re-named the content of your xml file from Map2 to Map1, simply import it again and replace all existing objects [source, target, mapping] of it. Now your Map1 will have your original contents which were prior to any changes.

2. Invalidate the Map1 -- This is a simplest way of doing it. Just invalidate the map1 [ delete the target from your mapping and it will get invalidated] and refresh your workflow. Since your mapping is invalid, informatica will prompt to you point the workflow to a valid mapping.


Now just re-point your session to Map2 which was your original code.

55 - How to implement scd-1 using only sql query

What -- To check how to implement how to implement SCD-1 using only SQL Query, we first check What is SCD -1. If you google it, you will be number of results, below is the one from WiKi..
http://en.wikipedia.org/wiki/Slowly_changing_dimension
In simple words, SCD-1 is type of Dimension Modeling wherein we do not maintain History of changes; and based on primary key [or surrogate key] we update the existing records and insert records which are new.

How -- We will take a simple example of Countries table [Dimension table], to implement SCD-1.

We will insert data from Country_Stg to Countries_Dim, both Stg and Dim are relational tables; However our stage table holds incremental data [Truncate and Reload] whereas Dim table holds history / all data.

Structure of our Countries table is as below. Both Stage and Dim table has same structure as below

Country_ID is our primary key. If we go by Informatica Option for SCD-1, we will have to add Target Lookup on Countries table [ as its our target ] and based on the lookup value we will decide if records has to be updated or inserted. To update the record we will again use Update Strategy.

SQL Query Option -- 1

1. You can write a simple SQL query at SQL Over-ride, which will return only new records from Stg table records; by this way you will insert only new records to your Dimension table.

SELECT STG.COUNTRY_ID,
STG.COUNTRY_NAME,
STG.REGION_ID
FROM COUNTRIES_STG STG
 WHERE NOT EXISTS(
 SELECT 1
 FROM COUNTRIES_DIM DIM
 WHERE DIM.COUNTRY_ID = STG.COUNTRY_ID
 )


2. Write a simple update statement to update existing records of Dim table from Stg table at Source Post SQL

 -- In Teradata
 UPDATE DIM
 FROM COUNTRIES_DIM DIM, COUNTRIES_STG STG
 SET COUNTRY_NAME = STG.COUNTRY_NAME
 , REGION_ID = STG.REGION_ID
 WHERE DIM.COUNTRY_ID = STG.COUNTRY_ID

 -- In Oracle
 UPDATE COUNTRIES_DIM DIM
 SET (COUNTRY_NAME, REGION_ID) =
 (SELECT COUNTRY_NAME, REGION_ID
 FROM COUNTRIES_STG STG
 WHERE STG.COUNTRY_ID = DIM.COUNTRY_ID
 )


 SQL Query Option -- 2
 Second option is to use simple merge statement instead of separate Insert and Update as below.


 MERGE INTO COUNTRIES_DIM DIM
   USING (SELECT STG.COUNTRY_ID,
STG.COUNTRY_NAME,
STG.REGION_ID
FROM COUNTRIES_STG ) STG
   ON (DIM.COUNTRY_ID = STG.COUNTRY_ID)
   WHEN MATCHED THEN
   UPDATE  SET COUNTRY_NAME = STG.COUNTRY_NAME
                , REGION_ID = STG.REGION_ID
   WHEN NOT MATCHED THEN
   INSERT (DIM.COUNTRY_ID, DIM.COUNTRY_NAME, DIM.REGION_ID)
     VALUES (STG.COUNTRY_ID, STG.COUNTRY_NAME, STG.REGION_ID)


 Now the above Merge statement will do all you work of Insert and Update. Add this at Source Pre-SQL and as you do not need to process anything from actual Source Qualifier Query, just simply add below statement in Source Qualifier Over-Ride..

SELECT STG.COUNTRY_ID,
STG.COUNTRY_NAME,
STG.REGION_ID
FROM COUNTRIES_STG STG

WHERE 1=2

54 - How to update data without using update strategy

When you are pulling data from source and based on target's primary key if you are just updating it, without any complected logic, then you can update those records without using update strategy.

Lets have a quick glance at below table..

By Default Rows coming from Source Qualifier has type as Insert; we use update strategy to change that type from Insert to Delete / Update


1. Data Driven -- When we select treat source rows option as Data Driven, mapping will get the priority. And if we change the incoming row type from insert to update / delete using Update Strategy, corresponding rows will get updated / deleted.

2. Update -- When we select treat source rows option as Update, all rows coming from source will be treated for Updation by default and your session / task will get the priority. You don't need update strategy at Mapping level to change the type.

Example --
Let's create a simple mapping which will insert data into target table and at session level choose Treat Source Rows As option to "Update"

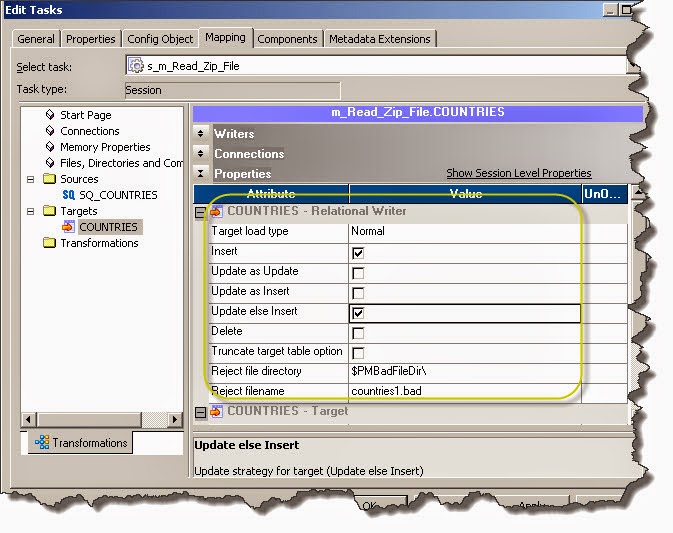
Considering your target as relational table, you need to select below options at target level in your session


As stated in first table, when you select any option mentioned below, you have to select Insert check box by default
1. Update As Update
2. Update As Insert
3. Update else Insert

Note -- if you do not select the Insert check box, and run the mapping like that, you will get below error as all records will get rejected.

Severity    Timestamp    Node    Thread    Message Code    Message
ERROR    3/18/2014 7:15:47 PM    node01_gogate    WRITER_1_*_1    WRT_8118   
ERROR: Target table [Countries2] does not allow UPDATE
Row # [0] in bad file


Below is the screen shot from infra help files.

 So, if you run the mapping now - since you do not have any records at target - all records will be first get inserted.

If you run your mapping again, and since now you have all records present at target, now same record set will be updated.